Hello, my name is Liz Smith and I am an amateur photo editor. I have taken tips and tricks from many sources over many years to put together the method of photo editing that works best for me. I make no claims that this is the best way, the only way, or even the right way. But it's my way and it's my hope that maybe something I mention will help you get the effect you want in your own product shots.
OK here's my version of photo editing:
An online shop is only as effective as its photographs. Good product photography will always be your best marketing tool. I don't have a fancy camera, I use an older model Kodak Easyshare, so I try to make my photos shine with Photoshop. I'm using an older version of PS, CS3. This information will be most helpful to you if you have at least a little experience using Photoshop.
I have a shelf near a window where I put down some white paper and capture the natural light on my subject, which today is a little felted wool pincushion. I set up an object to be in the background and give the photo some depth, in this case a stack of folded linen fabric.
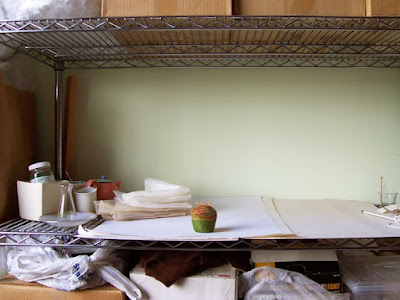
(UPDATE: I'm sure you already know to set your point and shoot to the tulip setting which is Macro for taking close-up shots.) I take a bunch of shots from slightly different angles keeping in mind my final composition will be square. I try not to take 30 shots because I don't want to have to sort through 30 pictures later, I will probably take 5-10. Here's the one I'll edit today:
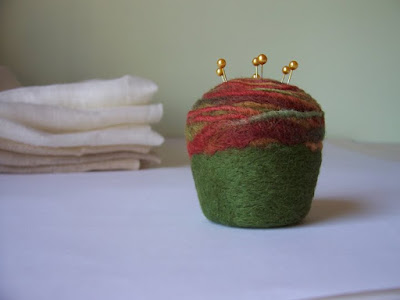
I open the picture in Photoshop and use the crop tool to make my favorite size for Etsy listings, 8 inches x 8 inches at 125 DPI. This makes it so when my customer clicks on the picture it will become larger and give them a chance to take a good, close look while the picture remains within Etsy's size parameters.
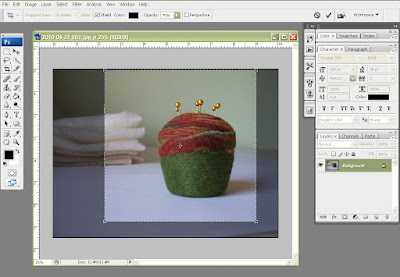
I make a copy of this layer so I can work on the copy without ruining the original picture. When I use layers, if I don't like how the adjustments I've made look and it's too much to undo undo undo, I can discard the whole layer, make a new one and start again.
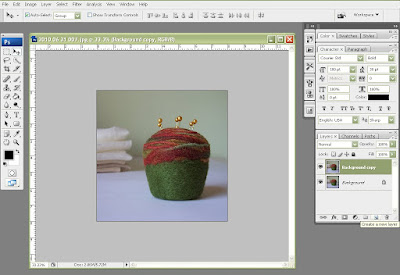
Sometimes I mix it up, but usually the next thing I do is adjust the color. I like my images to look a little golden so I boost the red and yellow.
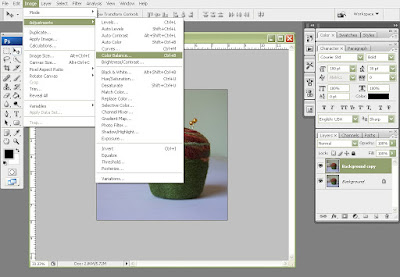
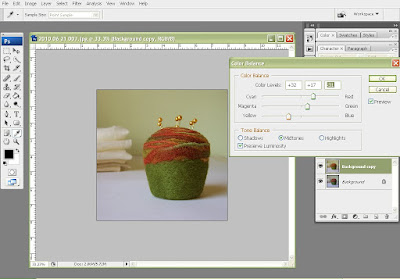
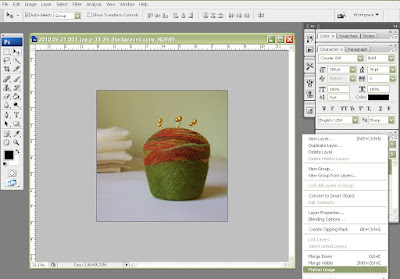
After each successful adjustment I make, I flatten the layers and make another copy.
My photos always seem to come out of the camera with a grayish cast so another adjustment I make is brightness and contrast.
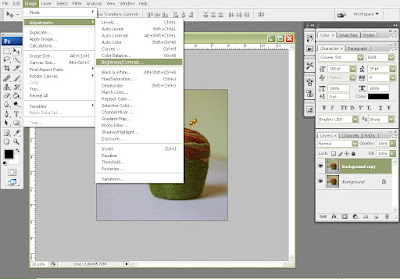
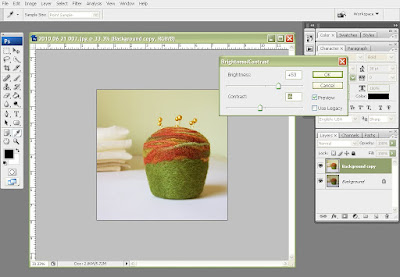
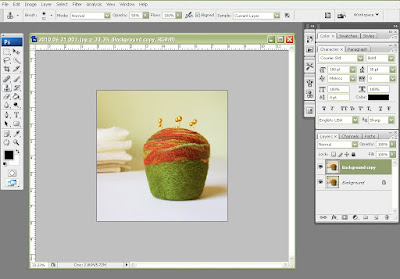
Sometimes I will raise the brightness while reducing the contrast so details are not lost, then flatten, make a new layer and heighten the contrast as a separate step.
If I over brighten, the details can get blown out. Sometimes I will brighten an image and then use the eraser tool on the blown out highlights so the darker version from below shows through. You can adjust the strength of the eraser tool to slightly erase portions of the top layer or full strength to fully erase.
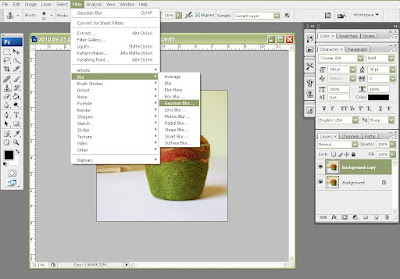
I also use this erase-parts-of-the-top-layer thing to create the illusion of depth of field. If I had a single lens reflex camera with which I could manually adjust the focus, I could make my object clear while letting the background blur out. I love that look. I fake it using layers, Gaussian blur and erasing.
I make a layer copy and apply Gaussian blur, adjusted to the level that works best for this photo, concentrating on how the background looks.
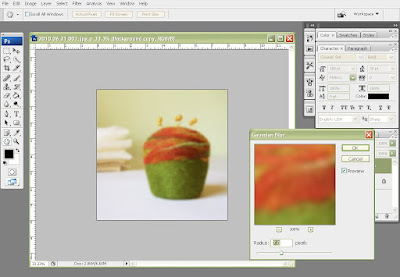
Then I start erasing the object I want to remain clear on the top layer. I'm terrible at using selection tools so I just carefully erase using the eraser tool.
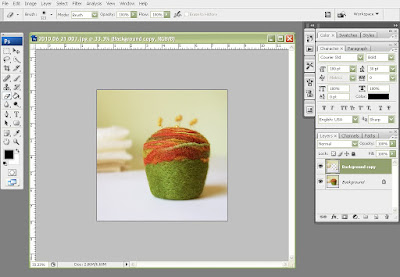
I sometimes hide the bottom layer for a minute and see where I'm erasing.
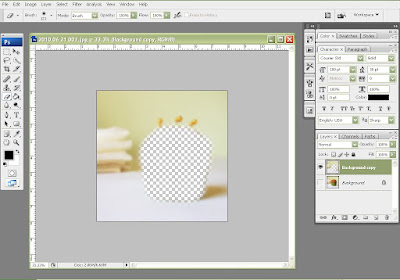
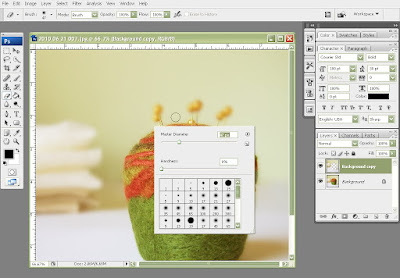
I enlarge the image (Ctrl +) and adjust the eraser size (right click) to work on the small details
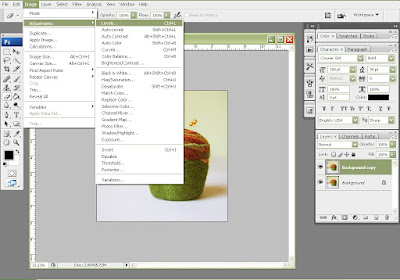
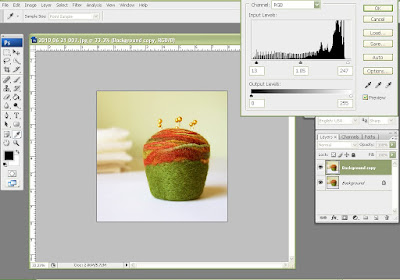
I used to go to Levels first thing when I edited an image, and sometimes I still do. But I found I prefer to use color balance and Brightness/Contrast first which to me, feel like more nuanced adjustments. Levels is a great tool to add a sharp bit of brightness and contrast so if the picture still lacks that eye-catching zing I like to see, I'll touch up the levels a bit.
I didn't illustrate its use here, but another tool I love is the Clone Stamp. You can clone out little bits of lint and dirt, or use it at a reduced opacity to clone out weird blown-out highlights and such. I also use it to clean up and straighten the horizon line in the background.
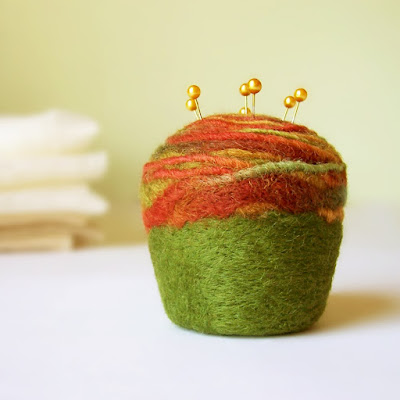
Here is the final picture I will use in my Etsy listing:
That's my quirky little version of photo editing for product shots. Thanks to all the kind and generous people who have shown me the different things I can do with Photoshop which have become invaluable in running my online business.
UPDATE: Here's a link to Julie's response tutorial on using masks and layers!



FYI, Adjustment layers and masks will change your life... use them and love them! Trust me, you'll wonder how you lived without them.
ReplyDeletegreat tutorial though, will share with my etsy team
Thanks for reading and commenting! Do you have a tutorial for using adjusment layers and masks you can recommend?
ReplyDeleteI did not know how you make those beautiful photos you have in your Etsy shop ! This is fascinating.
ReplyDeleteYour final photo is beautiful,
a great finale to this blog post.
You do such a great job writing your tutorials!! And you do a great job of making little things look beautiful as well as making beautiful little things! Bravo!
ReplyDeleteThanks for always reading my blog posts and giving positive feesback, mom, I so apprecuiate it!
ReplyDeleteAnne, wow, thanks so much for the kind words. That means a lot coming from a photographer whose work I admire so much!
what if you only have elements?
ReplyDeleteWow. This tutorial is so super helpful! I will be opening an etsy shop or some sort of online shop before the end of the year, and I have never touched photoshop or any of those programs. Thanks for the tutorial; it makes the process less scary!
ReplyDeleteWOW! that is SO helpful. what a difference that makes!! i don't edit any of my photos. no wonder they are crap! :) just downloaded photoshop elements trial, so we'll see how it goes! thanks for this.
ReplyDeleteIt took me years to hone the look I wanted for my product photos using photo editing programs, it's an ongoing learning process. I'm glad to hear this demystifies it a bit!
ReplyDeleteThis tutorial is specific to Photoshop, I have never used Elements and have no idea how it works. I suggest finding an Elements specific tutorial.
love the gaussian blur & erase tip!
ReplyDelete(now i'm hungry for cupcakes)
Thanks for the great tips on editing, a process I am trying to figure out. Will file this tutorial for future reference.
ReplyDeleteGreat tutorial. Thank you
ReplyDeleteI have elements and its pretty much the same on there too. Theres a drop down menu under ENHANCE which allows you to change the brightness, contrast, lighting colour etc. You will find the gaussian blur in the FILTER drop down menu. Hope this helps.
This post has really made me feel like looking into Photoshop more. I generally stick to the levels and the clone tool, but I'll try to figure out the layers. I like the blurred background too. Would love to master the technique with the Gaussian filter!
ReplyDeleteGreat tutorial! I like seeing how other people work in Photoshop - it's so versatile. I stopped by your shop - you have lovely photos. Thanks for sharing. :)
ReplyDeleteThanks a lot! I´m starting on advertising the things that I make.. Loved the idea of using the blur strategy.. I´m reading The Handmade Marketplace and that´s how I found you.. Good luck! :)
ReplyDeleteNoca Passos
http://mariafulo.blogspot.com/
I must say even with a normal camera but using intelligent lighting/background/model strategies, AND some of your pointers, its achievable to make nice pictures! Your post definitely helped my Etsy shop look nicer. And I'm going back on older pictures when I have the time too! Thanks again!
ReplyDeleteThis is really amazing. I have avoided taking product shots of my art prints because I get frustrated with the results using my point and shoot. I am new to PS, but you make the process look so straightforward that I think I can handle this! I will definitely be trying some product shots this weekend. Thank you so much for sharing your helpful tips :)
ReplyDeleteAH! Thank you! I am saving this for later so I can really ingest it. It's awesome to see your before/after pics. Gives me hope ;)
ReplyDeleteAwesome tutorial. I thought I had my photo editing process down, but you've given me lots to think about.
ReplyDeleteLoved this! I only have a point and shoot and this really inspire me to keep using it and not stress over not having a fancy shmancy one. Nice job!
ReplyDeleteThanks for this tutorial! I don't have Photoshop, but it still inspires me to keep working at my photos with my point and shoot:)
ReplyDeleteThanks for the tutorial! I an only learning how Etsy and photos go hand in hand...your photos are beautiful!
ReplyDeleteThis is great! These tips will surely help me improve my food blog. I thought I would need to invest in a fancy camera, but you do such a great job making beautiful photos with a point and shoot -- I am very impressed! Now I have no excuse to have poor photos! Thanks for the lesson and the motivation!
ReplyDeleteLove the post. Wishing I had any version of PS!
ReplyDeleteI take all my pics with a point and shoot too. Some have thought I use a DSLR tho. The macro setting on point and shoots do wonders for creating that blurred background everyone loves.
Thanks for the great tutorial. Will be bookmarking for when i actually buy PS.
-kristanlynn @ adelynSTONE
Thanks for the photoshop tips!
ReplyDeleteThank you ! Thank you ! I have an EasyShare too and keep thinking I need to get a new camera. This great tutorial has changed my mind. Thank you so very much for the tips!
ReplyDeleteI think Photoshop would be a great investment for me! I have a panansonic lumix, and have been editing with iphoto...it works, but doesn't have near the options that photoshop does! Thanks for this tutorial!
ReplyDeleteJust found this from the Etsy twitter... So super awesome! Thank you for sharing your process. This makes my item photography seem a lot less daunting, and I always love a good reason to use photoshop! :]
ReplyDeleteThank you!
Using the Macro setting on your camera to start out with can save you a lot of post processing time later. Also, if you're intimidated by Photoshop, Picnik is a very good free online tool that can be used instead.
ReplyDeleteThanks for the great response! So glad people are finding this little version of photo editing helpful. Like Danielle (Merriweather Counccil) said, even if you just come away with a tip or two that help you in your product photography, that would please me immensely :)
ReplyDeleteThanks for taking the time to share this info. I have shared it with the Aussie craft community on my Facebook page: www.facebook.com/contemporaryhandmadealliance
ReplyDeleteI was told that there is no point in using Photoshop unless you have a DSLR because the images will be too grainy. I GREATLY appreciate this post so that I have physical proof that you can use Photoshop with a point and shoot camera. Thank you!
ReplyDeleteI usually tweak the colors/brightness/contrast in my photos too, but I need to try out that background blur trick!
ReplyDeleteOne of my little secrets is the Macro setting (the symbol that looks like a little flower) for taking super-close-up photos.
I have a Canon Powershot SD600 Digital Elph. It's a good little camera. :)
I was perplexed at the poor girl who said she had to take marketing photos of her prints...how meta! I must admit that a huge roadblock to me selling my work has been the thought of photographing the stuff. I used to have my photographer husband do it, but then we split, so that's not an option anymore.
ReplyDeletePhotoshop has always been somewhat of a mystery to me, but since you put the steps into plain English, I'm sure I could even do it. I have the patience of a hamster, but having someone explain it as well as you did sure helps. Would be great to see other tutorials on all of the ways you use Photoshop. If you do this, please count me in as a willing student!
Thanks again for the great response! I know Photoshop is complicated so I understand how helpful tutorials are.
ReplyDeleteYes, always use the tulip or Macro feature on your camera for close-up shots, I added that in my instructions above, thanks.
For more Photoshop tutorials visit the nice folks over at:
http://www.tipsquirrel.com/
Very nice tutorial. For product pictures, I really recommend a lightbox photo. Saves on editing time!
ReplyDeleteLove this tutorial! I always find it so interesting to see behind the scenes of product shots! Thank you! I too prefer my point and shoot for product shots and the macro setting is my best friend! :)
ReplyDeleteWhat does Flattening the Layers do? I've always wondered this, thank you!
ReplyDeleteThanks Lindy! Flattening takes the layers you were working on and makes them one layer.
ReplyDeleteOkay....thank you so much for answering my question! :)
ReplyDelete